
Module 1 — Effective
writing: Strategies
and principles
| Course Guide | Module 1 | Module 2a | Module 2b |
Activity 5: Using the Outline tool in Word
If you haven't used Outline view, try this exercise; it's not as long as it looks. The content of this exercise is deliberately simple in order to allow you to concentrate on the process.
- Open a new document.
- Go to VIEW and click on OUTLINE.
- Type in Dogs and hit ENTER.
- Type in Cats and hit ENTER.
- Type in Horses and hit ENTER.
- You now have three first level headings for a report you are writing on The Best Pet to Buy for Children. These are main headings, called HEADING 1 on the pull-down menu on your toolbar next to the window that gives the font you are using.
Now go back to Dogs and position your cursor at the end of the word, hit ENTER and then click on the second arrow on the Outline toolbar (or hit TAB). You are now going to put in a number of sub-headings for your discussion on dogs. There are two. Type in Good points, hit ENTER and then type in Bad points. These two headings are second level headings (HEADING 2 on the pull-down menu).
Position your cursor at the end of Good points and hit ENTER and then TAB. You will now be able to put in some third level headings (HEADING 3): Faithfulness ENTER; Fun to play with ENTER; Good security ENTER. Go through the same process making up some level 3 headings under Bad points.
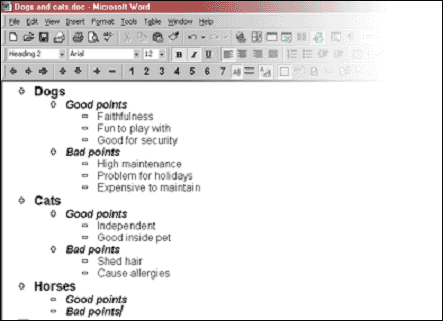
Do the same for Cats, making up your own second and third level headings. Your Outline view should look like the following:
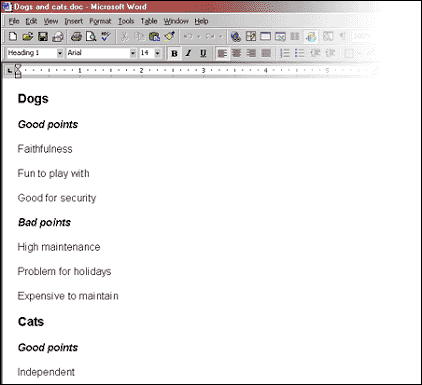
When you have finished this, go to VIEW and click on NORMAL. You will see something like this.
Now you are free to start writing within this plan anywhere you like. Let's say you feel ready to start writing about Fun to play with. Go to the heading and place your cursor after it. Hit ENTER. Type a short paragraph.
Now go back to VIEW and hit OUTLINE. You will see your paragraph there with all your headings. Go to the toolbar and click on the 3, then the 2 and then the 1. This will enable you to see your plan at different heading levels.
Imagine you now decide you should have started with Cats rather than Dogs. Put your cursor on the plus sign in front of Cats and drag Cats and position it in front of Dogs (or vice versa). If you now go back to NORMAL view, you will see that all the subheadings were moved with the heading. You can also change the level of heading by using TAB or the arrows on the toolbar.
Outline will only work if you assign levels of headings. However, going through this process of deciding on heading levels is in fact the process of sorting out your material, structuring your thinking and ordering your ideas all essential steps in drafting effectively.
Note: these instructions demonstrate various functions in Microsoft Word that can be helpful to you in the writing process. Subsequent versions of Word may display these functions differently than displayed here. However, the basic functionality behind each demonstration is consistent and should be available to you in whatever version your computer has.