Since computers have replaced the pen and the typewriter, the terminology of headings has changed, but the concept behind the use of headings remains the same as it always was.
| CONVENTIONAL TERM | COMPUTING TERM | CALLED IN MS Word |
| Main or principal heading | Level 1 heading | Heading 1 |
| Sub-heading | Level 2 heading | Heading 2 |
| Sub-sub-heading | Level 3 heading | Heading 3 |
Modern software like Microsoft Word makes it easy for the writer to use headings efficiently. Next time you are using Word, ensure you have the formatting toolbar active (Go to VIEW, TOOLBARS, FORMATTING), then look at the STYLE drop-down menu (its window usually says normal) at the top of your screen (its exact location will depend on how your toolbars are arranged). Put your cursor on the arrow and pull down the menu. You will see a range of different levels of headings showing up.
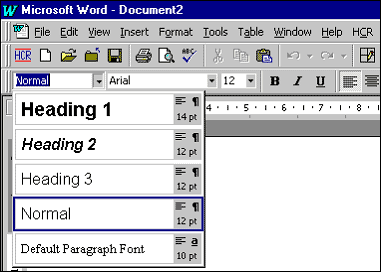
The default for Word shows just five headings: Default Paragraph Font, Heading 1, Heading 2, Heading 3 and normal. You may find others there. They get there when you work on documents that have other levels of headings in them (Word is being 'helpful' in putting them there in case you want to use them — but in practice, these can be troublesome).
The levels are distinguished from each other by the size of the font, the type of font, bolding, italics and line spacing before and after the heading. The fundamental principle of heading design is the higher the level of heading, the more noticeable it is. In any heading style, you'll notice the top-level heading is the largest, darkest, boldest, most highly visible heading on the page.
The size, font, bolding, spacing, etc. are controlled by STYLE (you will find this by going to FORMAT on your toolbar and pulling down the menu and clicking on STYLE). If you go to Heading 1, for example, you can see what font is used, its size, and how it is placed on the page. You can change this for the document you are working on if you need to. When you are working on a template, it is this STYLE that has been predetermined, so don't change it if you are working collaboratively or on a template.
If you have been stopping and bolding your headings or increasing the
size of the font, etc. every time, you should consider becoming familiar
with using the headings facility in Word. It will save you a lot of time,
and your document has more chance of having a consistent layout.
Using headings has an additional bonus if you are writing a long report.
If you have designated your headings with the headings facility, you only
need to go to INSERT, INDEX and TABLES, TABLE OF CONTENTS, click OK and
you have an instant, well set-out Table of Contents.
Do you recall the activity you completed in Module 1 on outlining (it
was about dogs and cats)? The outlining facility automatically puts headings
into your document at the level you dictate when you create your outline.
So, you can put in levels of headings in three ways:
- You can begin your document by using the outlining facility to produce an outline first.
- As you draft, you can use the heading window on the formatting toolbar.
- After you have written your first draft, you can go back through your document, highlighting your headings and giving them a level from the heading window.
If you like to work from a plan, your best choice is the first option. If you like to plan as you go, use the second. The third option should really only be used if you receive a document without headings and want to put them in.
It is best not to use more than three levels of headings in a report.
The more there are the harder it is for the reader to distinguish between
them.